


Before I go any further...I must warn you this is a long post. So, sit back and enjoy!
I went through my stash of Piggy Tales and pulled out my favorite collection EVER! Thumbelina Collection. I LOOOOVVVVEEE IT!

Was I right or what? Stinking cute!

I gave myself a challenge. I wanted to see how much I could create with just three sheets of the Piggy Tales paper and two sheets of red card stock. I know in these "tight" financial times, I like to see how far I can push a project and I think I did pretty well this time!

I put together this great desk set! I love it! With just three sheets of patterned 12x12 paper and two sheets of card stock.

A .25 cent composition notebook.

A clearance raw wood photo block for $2.00. I painted the bottom trim and edge of the top to the box in a cream color. The rest is just the paper cut and glued on with Zip Dry paper glue.

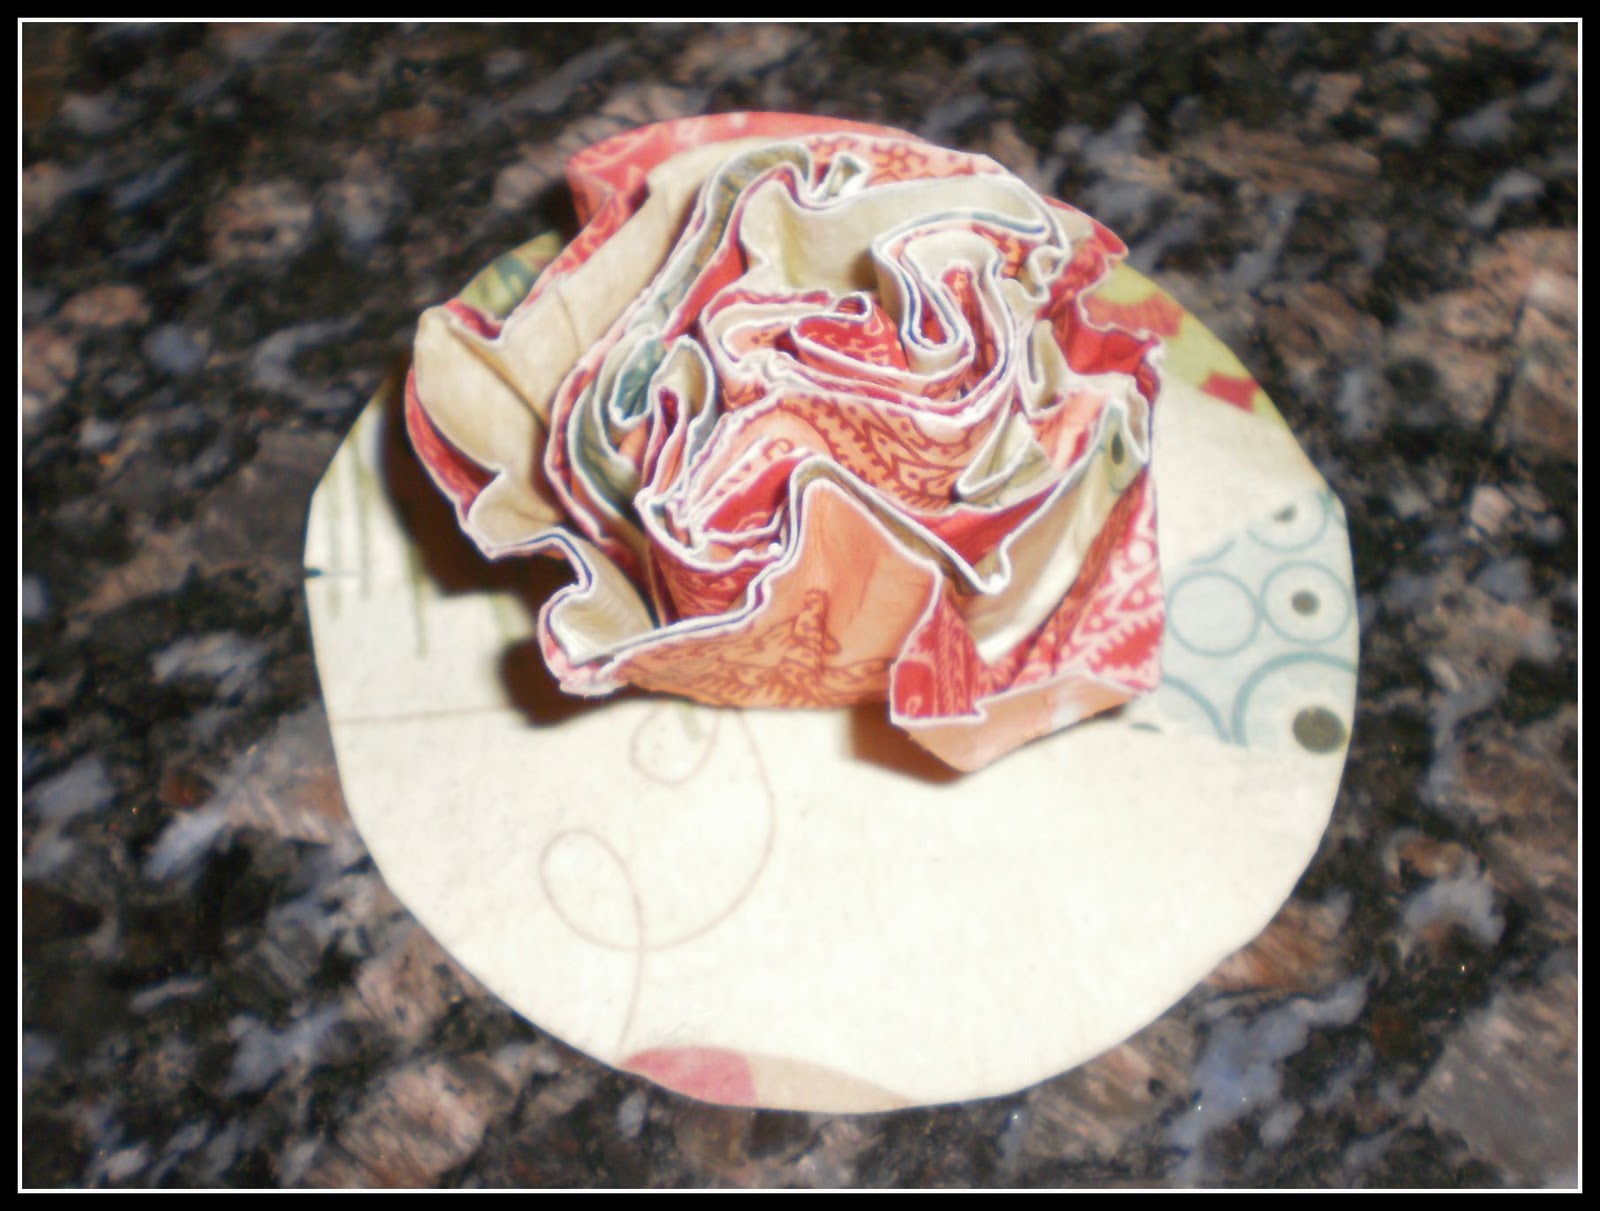
I made this super cute flower for the top of the storage box. Pssst....by the time you are done reading this post, you too will know how to make this cute paper flower!

You gotta have candy on your desk! :) I used a tiny mason jar as to not have too much candy on my desk. Although, is that possible?

I barely had enough patterned paper to make this pen holder! Notice that I ran the paper through my sewing machine.

Next, I put together this SUPER-D-DUPER Stationary Portfolio. I wish I could call this my own creation, but I can't. I met a great gal a couple of weeks ago at a crop, and instantly knew I liked her. Her name is Kristy and she is super talented. Kristy showed me this great idea for a stationary portfolio, and I was sold. I had to make one! When you are done reading this post, visit Kristy HERE and check out her stationary portfolios! While there, let Kristy know I sent you!

This is the inside of the portfolio. There are six cards and envelopes all ready to be be sent out!

See, super cute ~ right!
So, I said earlier that by the end of this post, you too will know how to make the paper flower on the photo storage box!


So, here we go, I am going to show you how to make this super cute paper flower!

First, cut 8 circles out of double sided patterned paper.

Once cut, layer the circles in any random order.

Paper pierce through all layers and add a brad to the center of the flower.

Next...walk on over to your kitchen or bathroom, whichever is closest to you.

Don't think I am nuts...run the paper flower under water, concentrating on the first layer of the flower.

Once wet, crinkle up the top layer of the flower inward.

Keep pinching the paper to the center.

Repeat for each layer.
Keep pinching!

When you have all the layers wet, your squished flower should look like this.

Poor sad flower. Now you want the flower to set 20 minutes or so. It will then start to dry.

Very gently and slowly, open flower up to reveal how beautiful the flower really is! The more it dries, the harder the paper will become, holding the flower in place.

The flower is still quite wet. You honestly have to let them dry overnight.
This is truly a no fail flower. Now, if you fail, don't email me!
I have really loved working with paper tonight...but it is time to go back to the sewing machine! I have some orders that need stitchen! :)


Wow this is so awesome, I love the paper flower!!
ReplyDeleteI can't believe you were able to create so much using so little; I am truly inspired and I can't wait to try making a flower!
ReplyDeleteI love all of your creations!! That paper is really cute! The flower is awesome. :)
ReplyDeletecute idea... I think I'll definitely have to try this. I invite you to come link up at I Made It! Monday on Ninth Street Notions.
ReplyDeleteAwesome creations! Love your paper flower. :)
ReplyDeleteDo you know how helpful you have been by sharing this paper flower? Thank you so very much.
ReplyDeleteI've made flowers like this before but only with three circles. I have to say yours are fantastic! Your other projects are also great! I'm your newest follower - thanks for inspiring me!
ReplyDeleteLove it! OMG my house will be full of these, now where did I put those brads??EEK!! Lori
ReplyDeleteThanks everyone! The flower is unique and fun! I hope you all make it!
ReplyDeleteThis desk set is such a cute idea!
ReplyDeleteAlso, that little flower is cool, can't wait to try it!
I'd love it if you'd like to join my weekend linky parties (from Fri to Sun) - it would be so nice to see your creations there too! :)
I love that flower - I will definitely be using that! Thanks for linking up to Fantastic Friday - I hope to see you again this week!
ReplyDeleteThese are all so cute! I {love} the portfolio! Thanks for the shout out!!! I just adore your super craftiness! I can't wait until next Saturday! See you then!
ReplyDeleteEver since I found your tutorial of this paper flower, I have been wanting to try it out and could not find a good excuse. Well, I found one. I had a birthday party to go to and needed to make a card. So I made a flower cutout with my cricut and thought it looked pretty plain. I spiffed it up with your water trick. Check out my post about it.
ReplyDeletealohacrafts.blogspot.com
Thanks for sharing your great crafting talent.