Custom Blog Design

Sunday, January 30, 2011

Birthday Blocks Giveaway!

I showed you all these great birthday blocks a few weeks back.
Well, I have a couple of these kits left and so, I thought I would give one of the kits in this giveaway and throw one up in my Etsy store. I made up the last two kits, so the giveaway is for a finished kit. If you win, you will receive what you see in the picture (less the fabulously kit kid picture! 
This Happy Birthday block set is a perpetual birthday calendar. There are four blocks total. The first block measures 5.5 inches wide and 8 inches tall. The two center blocks that say Happy Birthday both measure 12 inches wide and 3 inches tall. And, the final block that holds the monthly birthday printout measures 2.5 inches wide and 8 inches tall. Giving the total piece a measurement of 20 inches wide and 8 inches tall. 
Each month you could display in one spot, everyone's birthday for that month. 
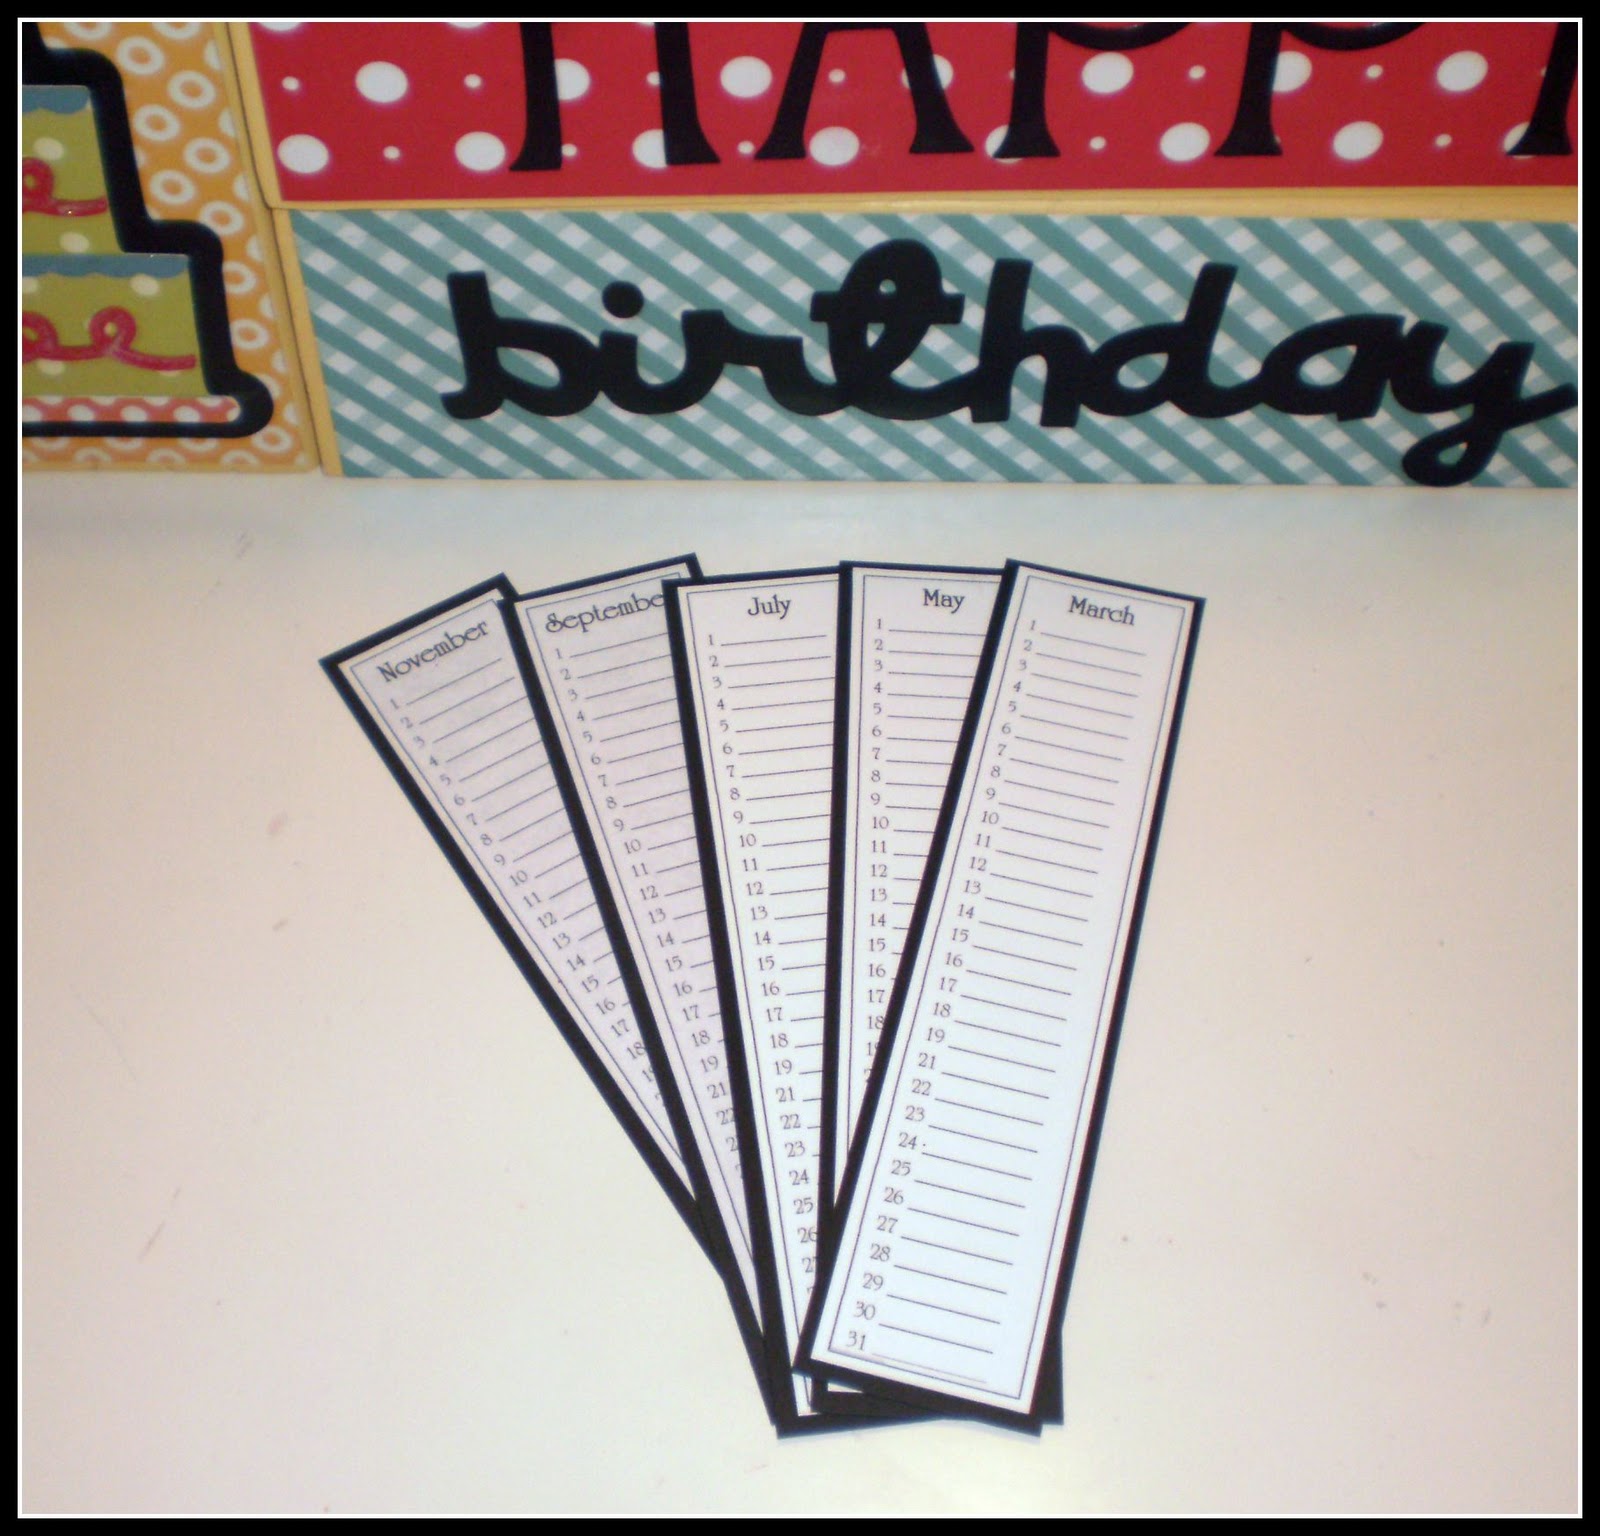
The monthly cards are stored conveniently in an envelope on the back side of the "Birthday" block.  
Personally, I think that this block set would be great for teachers. Each month you could display a picture of the child whose birthday it is. There are 4 photo holders on this kit. This would also work great for church children's programs.

Ok, the rules for the giveaway!

1. Become a follower of Crafty Girls Workshop.
2. Become a follower on Facebook (button on sidebar).
3. Leave me a comment on what you want this year for YOUR birthday.

That's it. Super easy. So, enter now...because hey, who doesn't love something free!

I will close this giveaway on Sunday, February 6th and announce the winner on Monday, February 7th.

If you are the winner, you will have 7 days to email me with your mailing info. Also, I can only mail to the United States.

Friday, January 28, 2011

Europe Anyone?

I found a bag that I had started a while ago, a bag that was put in a "safe spot", only to have me forget where that safe spot was. Well, tonight I came across it and thought that I should finish it!
I love the colors in this bag! Doesn't it just make you want to grab your passport and go away! 
I made a cute fabric flower for the front of the bag.  
That bag itself is made with a tan linen type fabric and the cotton "travel to Europe" fabric. There are three different interfacings in this bag. 
This is the back of the bag. There is a long pocket on this side of the bag. 
There are two pockets on the back of the bag 
I used the nice linen fabric for the lining of the bag. There are 6 large pockets in this bag! 
Aren't the colors great! Front

The bag is a large bag, approximately 17.5 inches wide, 10.25 inches tall and 2.5 inches wide. It will fit under the seat in an airplane, therefore, go ahead and pack it full! I wonder if I will ever make it to Europe!


Thursday, January 27, 2011

Same Calendar, Different Color!

Earlier tonight I received a very nice email from a gal, Candace, letting me know that she loved the calendar I made a few weeks ago...(you can see the post here)
I love this calendar too! I have one hanging in my "cubical" at work, and I love looking at it everyday! Candace wanted to know if I could make the calendar in reds, blacks and whites. OH, HOW I LOVE this color combination! So, of course, I set out to make the calendar in the red, black and whites. I loved the style of the original calendar, so I figured, why reinvent the wheel! So, this is how it turned out.... 
Ok, now that it is done, I really think I like this one better!  
I loved that I used twine in the black buttons! 

I love how the "month" card and the 4x6 picture is held on with cute magnets!
You can change out the picture monthly!

Can't wait to hear from Candace! I hope you like it!


Tuesday, January 25, 2011

Coin Purse

Today I had to run to Joann's to pick up some interfacing and I was looking around when I saw this coin purse handle...
I have made coin purses in the past, but I used the handle where the fabric is glued to the handle. I noticed that this handle was to be sewn to the fabric. The handle was $3.00. 

Although, when I got home and pulled it out I noticed that there were no directions at all with the handle, so I attempted it blind.
The first thing I did was trace the top of the handles on a piece of paper. 
I drew out the rest of the bag, totally freehand. The nice thing about this part, is that you can make the bag as big as you would like. I chose to make this bag about 5 inches tall.

I then cut the main fabric (red felt) and the lining fabric (cotton) using the paper pattern that I had just made. 
I knew that I wanted to add a little bit of embellishment to the bag. So, now is the time to do that. I just made a layered felt flower and a yo-yo flower. I used dmc floss to make the stems for the flowers and added a few buttons. Super easy! 
So, then I placed right sides together and used the handle as a guide as where to start sewing. I used a 1/4 inch margin. 
Clip the corners of both the lining and main fabric. Turn the main fabric right side out. Leave the lining right side in. 
Slide the lining to the inside of the main fabric, so wrong sides are together. 
Next, I stitched the handle to the fabric. There is a "gutter" of sorts where the fabric will go into in the frame. Once you stitch, the fabric does stay in place. *Side note...I did whip stitch the main fabric and the lining together before this step. 
Once I went all the way around the handles, I tied off the dmc floss and I was done! 
This is a sweet little coin purse. Not too sure I like the stitching showing on the handle, but I am so glad I made this. This was easy enough for a tween to make this. And the best part was...it only cost $3.00! I had all the fabric, and now I have a new coin purse!

Total time to make this from start to finish...43 minutes. So, it is that quick little gift to make some one when you are in a pinch!

Happy Wednesday!


Project Gone Wrong!

Have you ever had an idea in your head and translating to reality sometimes is difficult? Well, that is what happened to me tonight. I had the idea of a super cute ruffled heart on a baby onsie. It started out ok...
I picked out the fabrics I wanted to use.  
I cut the fabric into three quarter inch stripes. 
Yes, I know, I should have stopped here. This looks like a hot mess! 
Actually, I thought that after trimming the edges and placing the heart to the onsie that the project could be salvaged. 
NO WAY! Embroidery gone bad! YUCK YUCK YUCK! I had such high hopes for this idea that was in my head....I think I am going to go to bed.

I was so frustrated that my idea didn't work out, that I knew what I had to do. I needed to sew a bag! Because of the frustration level...I was not planning on blogging the bag I made tonight, so I didn't take any picture of making the bag. But, after I was done with the bag, I wished I would have taken pictures to show you, because I LOVE IT!  
If you are a red/black and white fan, you will love this bag!  
I added some felt flowers to the front of the bag for some whimsy. 
I love the contrast of the fabrics! 
There are four big pockets! 
I think this would make a great bag for church, work or even a knitting bag. 
The bag measures approximate 12.5 inches wide, 10 inches tall and three inches deep. Perfect size for a few books, crafts or binders. 
The back of the bag is cute too!

Ok, now I can go to bed calm!


Related Posts Plugin for WordPress, Blogger...