Check this out...

Thursday, March 31, 2011

Front Porch Make Over for Spring

I have an oversize front porch and ever since moving into our home, almost three years ago, I have kept the porch void of anything. Not by choice, just my indecisiveness on what I wanted. Well, I am ready to add a few things to the porch. But, HAVE YOU SEEN THE PRICE OF OUTDOOR FURNITURE! CRAZY!

I decided that I would do the front porch for free. I turned it into a challenge to see if I could do it for free. I first started at my parents house to rummage through their fun stuff in the garage.

First, I will show you how my porch looked to start with:

My house is light grey and the front doors are blue. These wreaths are really for fall....ya, I know, I need to change them!

I do have this fun post that has signs that change out for each season near the front doors. 
This is the vast porch to the right of the front doors.

This is the full front view of my house. Definitely needs some spring color!

So, this is the first thing that I stole borrowed from my parents. 
A super cool vintage metal plant stand. I wanted to paint it red. 
Almost done. 
Done! I love it red!
Next, I stole borrowed these two chairs from my parents:
Two very fun vintage wicker chairs. I decided to paint them the same color blue as my front door. I also had some canvas to recover the cushions. 
Here is what used to be the green chair.  
And here is the white rocker. 
My new look for the front doors. My mother let me borrow these two red sap buckets and I already had the flowers. Notice I also changed out the sign for the post for spring. 
So, now when you are at my front door, this fun little sitting area will greet you. I made the two back pillows out of red and creme fabric. And I added the burlap bee pillow. 
It is hard to tell because of the lighting, but there really is a big change to my porch. 
Gotta say, I think I like the addition of the American flag best!

So, in the end, I almost did this for free. The only thing I had to buy were the flowers for the red plant stand. $24. The way I look at it, $24 is a lot better than the cost of new furniture!

Tuesday, March 29, 2011

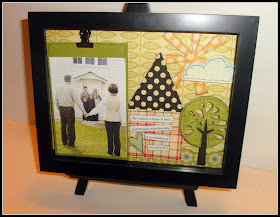
Paper Crafting with a Shadow Box Frame

I love shadow box frames! I have used them several places in my home. The first time I used a shadow box, I framed my husband's and my children's blessing outfits.
Then I made a shadow box for my husband for a Valentine's gift one year.
And now I made this shadow box frame for a fun family picture. 
You cannot tell from this picture, but everything is dimensional.
About a year ago, I took an online doodling class from Homegrown Hospitality and I absolutely love Stephanie's style. I copied her verse for the house in this frame - it was perfect! Stephanie is teaching doodling classes, so if you want to learn, check out Homegrown Hospitality
You can kinda tell from this picture that the house, tree and clouds are three layers of paper deep.  
This was one of the pictures that my friend Kristin Conk took last fall. I love that it is in front of an old church. Kristine is an awesome photographer! If you are in the Vegas area and need a great photographer you can find her on her website at  Kristin Conk Photography 
I know that the glare is too much to be able to read the verse in the house. The verse is:
"By wisdom a house is built,
and through understanding
it is established"
Proverbs 24:3 
The shadow box frame is an 8x10 frame and looks great on this little black easel.

Thank you Stephanie for your awesome talent!

Sunday, March 27, 2011

Bedroom Lighten Up

Earlier today I looked at our master bedroom, and I felt like it looked "heavy". With spring weather outside, I wanted to lighten it up. I cannot afford to go out and buy a new bed set for our bedroom. So, I removed some pillows and flipped a coverlet, and I think it looks a bit lighter.

Here is the before:

I do love my bedding set. My thought is to take away the red/cream check items and put the all white sheets on the bed.


Here is the after: 

I know that there is not much of a change, but I think I really like it. I flipped the red/cream coverlet and the reverse side is a tan color. I also took off the matching red/cream pillows. I like the pop of color that the single red pillow adds. My curtains are tan at the top, with red/cream pillow ticking on the bottom so I still have some red in the room. The best part is...this as FREE!

I am excited to show you later this week what I have been doing for my front porch...ALL FOR FREE!

Blog Question...

Hi there! Just a quick question...is anyone else having trouble making their pictures upload to their blog? My pictures are showing up in my "edit" box, but when I go to publish the post, the pictures aren't there. Very aggravating, to say the least! I went in and manually put the height and width in the HTML (because in my HTML, the height and width were defaulting to 0), but I am not sure what size they are suppose to be, so now my pictures look a bit off. Any advice?

Family Window

Last week I was online looking around at some blogs, when I came across this window at lil' luna. I loved the window! I knew instantly that I wanted to make this.
Isn't it splendid!
Here is my vintage window. I got this window last summer on a trip up to Utah with some girlfriends. I have been trying to figure out what to do with it ever since I got it. 
I used brown vinyl. I ran out of vinyl while cutting up the words for my window, and being the impatient person that I am, I decided to actually add a family picture to the window. I really like the picture on the window.
I put all the kids' nicknames instead of their real names. Each of their nicknames make me laugh, so I thought it would be appropriate for the window. Thank you Kristyn ! I relied a lot on Kristyn's window for the idea's in mine, so hopefully she doesn't mind me lifting her ideas!

Now, I need to decide where I am going to hang the window!
Happy Sunday!

Wednesday, March 23, 2011

New Crafting Apron

As most of you know, once a month I hold a Crafty Girls workshop where 18 of us get together and craft, scrapbook, eat and laugh. The workshops are a lot of fun, and I truly enjoy hosting. I am often running around to everyone that is attending, helping them, or just checking out what they are crafting. I tell myself each month that I need an apron with pockets to hold the miscellaneous things that I need to host.

Well, tonight was the night to make that apron. This is the fabric that I wanted to use:
These are four of my favorite fabrics.  
But, out of the four fabrics, this is my favorite. I love the sewing and crafting theme. My girlfriend found this fabric for me and I love the colors of the fabric. Such fun. 
I originally was going to use the red fabric for the pocket, but I felt that it covered up the main fabric too much, so I used the same fabric as the base of the apron, and I love it! 
So, here is my new apron on Ms. M. Here I go, I am going to sound like a broken record...I love how it turned out! 
I think that the ruffle along the bottom of the apron adds a "girly" feel! 
I also love the contrast of the waist band to the main fabric. I also did a double top stitch on the pocket. 
LOVE IT! 
I can't wait until April's workshop to wear my new apron!

Tuesday, March 22, 2011

Kitchen Towel Bag~

Some time back I was at Target and I was just strolling along the housewares department when I came across these kitchen towels:

I love the colors of these towels, and the green just caught my eye. Then, I went and felt the towels. Ok, Target....these are not towels, these are really pretty pieces of waffle cotton fabric. Cotton fabric to dry your hands is like trying to dry your hands at a truck stop with the paper that they provide to dry your hands with. I bought the trio of towels knowing that they would never make it into my kitchen.

So, tonight I pulled out these towels out. I am going through some stressful situations in my life, a crown falling out of my mouth is the least of these. So, I needed some therapy tonight and my therapy counselor is my sewing machine. The counselor and I came up with this.....

A super stinking cute bag! Those of  you that follow me know how much I love bags...you can never have enough! 
The cute little ruffle is sweet. 
This is the backside of the bag. 
I went to my button box and found this great yellow buckle. I decided to use this buckle instead of a magnetic snap on the inside. 
I love the green stripe fabric for the lining. 
The bag is the perfect size for a stack of magazines or books.

See, wasn't I right, these are not towels!

Great week to all!